前言
本文不涉及源码层面的介绍一下iOS项目工程的依赖管理工具Cocoapods,明确什么是RubyGems、Bundle、Cocoapods,为什么要使用这些工具以及我们还可以使用这些工具做些什么。
What’s RVM?
RVM是一个命令行工具,用来方便的管理用户环境下的ruby版本。
安装rvm后会在用户目录下创建.rvm文件夹,并在此路径下进行ruby版本管理。
1 | rvm list |
What’s RubyGems & Gem?

RubyGems是Ruby代码的一个包管理工具,在此框架下,一个Ruby包称为一个“Gem”,包含了一组特定功能的Ruby代码。
RubyGems同样也是 https://rubygems.org/ 的客户端,所有的Gem组件都会发布到该平台上,当我们执行 gem install xxx 命令时就是从该平台上获取对应的Gem资源。
使用 gem sources -l 可以查看本地环境的gem源地址
gem sources -a/–add SOURCE_URI
gem sources -r/–remove SOURCE_URI
可以添加或者删除gem源
每一个Gem都由三部分组成:
- Code
- Documentation
- gemspec
gemspec是Gem的描述文件,描述了Gem的作者、版本、元数据地址等等信息。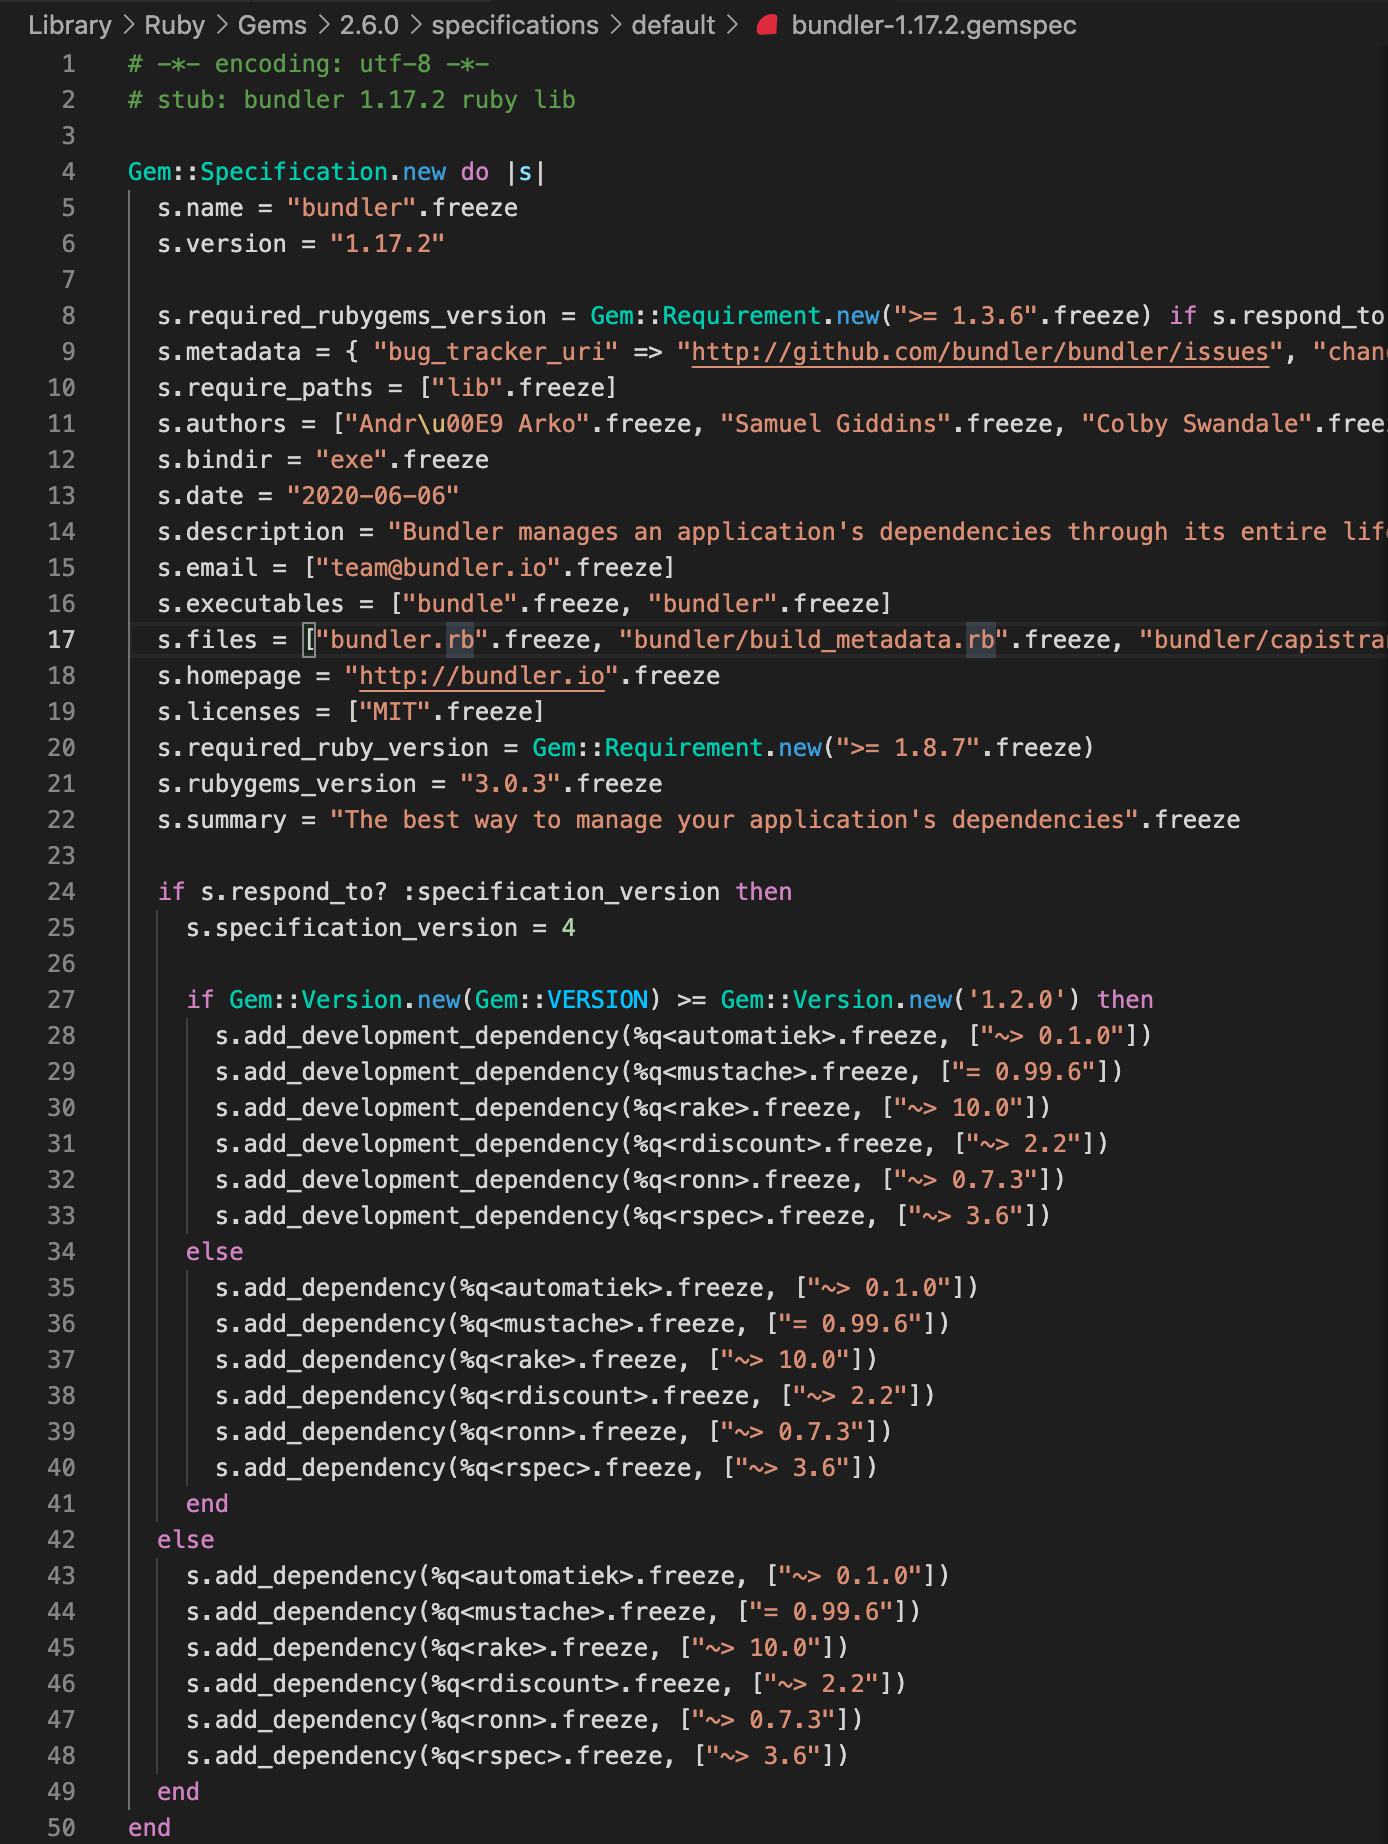
advance
Ruby工程组件化
disadvance
引入过多的gem会导致需要多次调用install gem XXX;
多gem还会引入依赖问题,设想你在本地开发项目A过程中使用了Gem1的2.0版本,而在开发项目B过程中又需要使用Gem1的3.0版本,这样环境中同时会存在两份Gem1,RubyGems会去使用gem最新的版本,因此可能会导致项目A无法运行,这种情况在多环境开发下更为显著,install gem XXX在不同时间调用时安装的gem版本可能也不相同。
What’s Bundle?
Bundler is an exit from dependency hell.
Bundle是一个Gem库,通过追踪并安装所需的Gem版本来为Ruby工程提供一致的开发环境,确保在开发、预发布和生产环境中都存在需要的Gem。
每个Ruby工程中的gem依赖关系由位于工程根目录下的Gemfile文件进行描述,同时bundle会生成Gemfile.lock文件进行版本控制。
bundle install
该命令会安装Gemfile中指定的Gem依赖项。
如果是第一次执行该命令(未存在Gemfile.lock文件),bundle会获取远程Gem源,根据Gemfile进行依赖解析并安装所需的Gem,并将安装的gem名称和版本写入Gemfile.lock文件内。
如果存在Gemfile.lock文件,Gemfile未更新,bundle将不进行依赖解析,直接使用Gemfile.lock内的Gem版本进行安装;如果Gemfile更新过,bundle将对更新的gem进行依赖解析并进行安装,其余未更新的gem仍然使用Gemfile.lock内的版本。
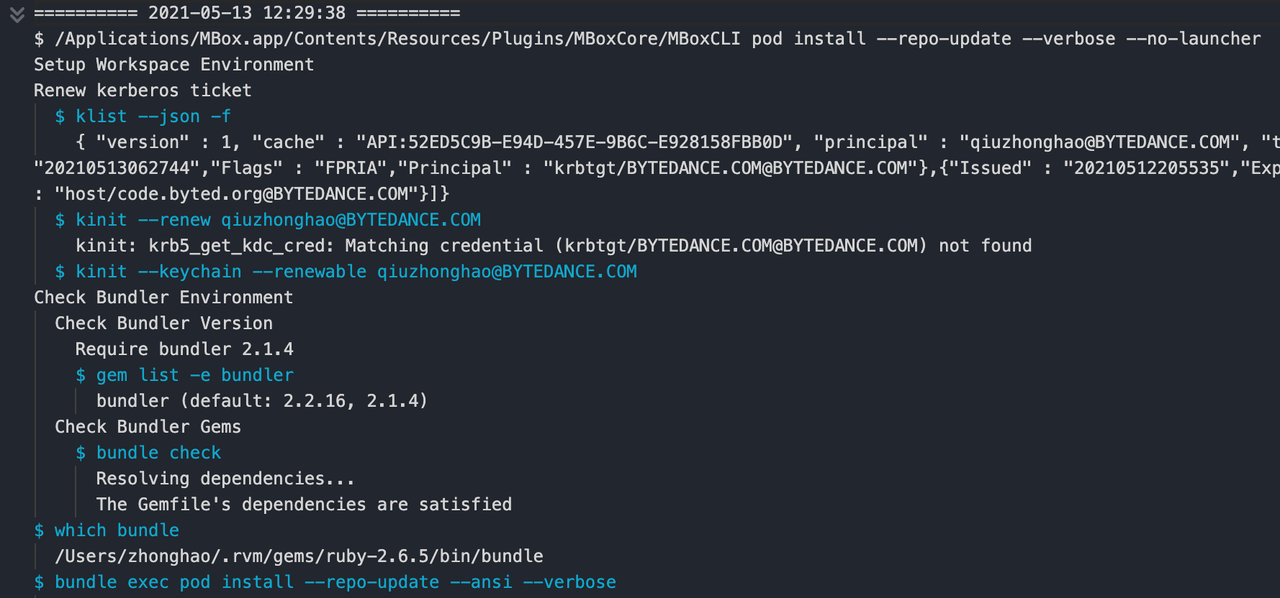
bundle exec
Execute a command in the context of the bundle.
这句话看起来很抽象,直接翻译为在bundle的上下文中执行一个命令。
实际上,如果你想使用Gemfile中指定的gem去执行一个ruby命令且使用bundle install去下载该gem,就应该使用bundle exec命令。
如何做到的?
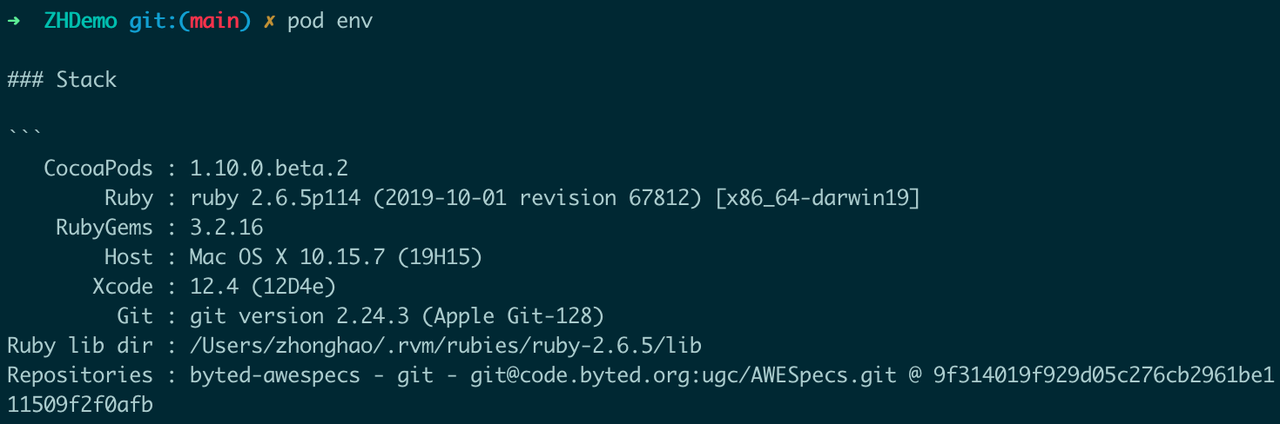
查看工程项目内中Gemfile和Gemfile.lock文件中指定的cocoapod版本,使用bundle exec ruby -e ‘puts $LOAD_PATH’查看加载路径,再使用pod env查看本地项目工程的cocoapods环境。
bundle exec会进行修改LOAD_PATH,让ruby加载Gemfile中指定版本的gem。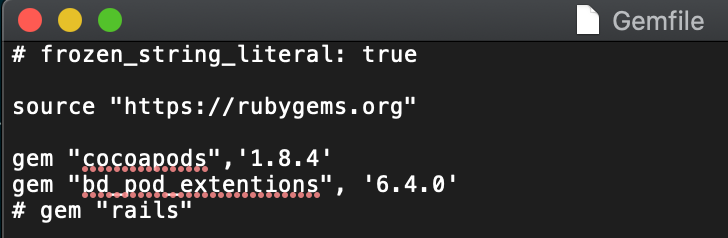

如果在项目工程目录下存在Gemfile的话,理论上之后调用Gemfile中指定的Gem相关命令的话都需要添加bundle exec命令前缀。
Q:这样太麻烦了,有没有其他方法解决?
A:有,rubygems-bundler这个gem就是为此而生的。
1 | gem install rubygems-bundler |
这样即可省略掉每次添加bundle exec的麻烦。
What’s Cocoapods?
Cocoapods也是一个Gem,负责用来管理XCode项目的依赖。
同bundle类似,在项目工程的根目录中可以使用一个简单的文本文件Podfile来进行依赖项指定,实际上,cocoapods会将Podfile当作一个ruby文件进行处理,这也使得我们可以在Podfile进行一些逻辑处理。
Podfile
The Podfile is a specification that describes the dependencies of the targets of one or more Xcode projects.
Podfile是一种描述一个或多个Xcode目标项目依赖关系的规范格式,使用pod init命令可以快速的为你的项目工程生成一个podfile。
install!
install! “cocoapods”, :warn_for_multiple_pod_sources => false, :deterministic_uuids => false
指定了Cocoapods安装此podfile的方法与选项。
- :clean
- 安装过程中是否清除pod的来源,默认为true,将会清除未被pod依赖的文件;
- :deduplicate_targets
- 是否对pod的重复数据进行删除,默认为true;
- :deterministic_uuids
- 创建Pod工程时是否生成特定的UUID,默认为true;
- :integrate_targets
- 是否将已下载的pod集成到用户工程中,默认为true;
- :lock_pod_sources
- 是否锁定Pod的源文件,尝试修改文件内容时,Xcode会出现解锁文件提示,默认为true;
- 在安装过程中锁定Pod会降低性能,如果这严重影响项目的Pod安装时间,可以尝试将其设置为false;
- :warn_for_multiple_pod_sources
- 当多个源包含名称和版本相同的Pod时是否发出警告,默认为true;
- :preserve_pod_file_structure
- 是否保留所有Pod的文件结构,包括外部来源的Pod,默认为false;
- 默认情况下,仅保留development pod源的文件结构;
- :share_schemes_for_development_pods
- 是否为所有develop pod共享Xcode scheme,默认为false;
- Develop pod的scheme时自动创建,而默认情况下并不共享;
- :disable_input_output_paths
- 是否禁用Cocoapods脚本阶段(复制Frameworks和资源)的输入输出路径;
- 默认为false;
- :generate_multiple_pod_projects
- 是否为每个Pod生成一个项目工程,默认为false;
- 此选项将在Pods.xcodeproj下的每个pod生成一个项目工程;
- :incremental_installation
- 是否仅重新生成自上次安装后改变的目标pod和它们相关的文件,默认为fasle;
- :skip_pods_project_generation
- 是否跳过生成Pods.xcodeproj文件,仅进行pod依赖关系解析和下载,默认为false;
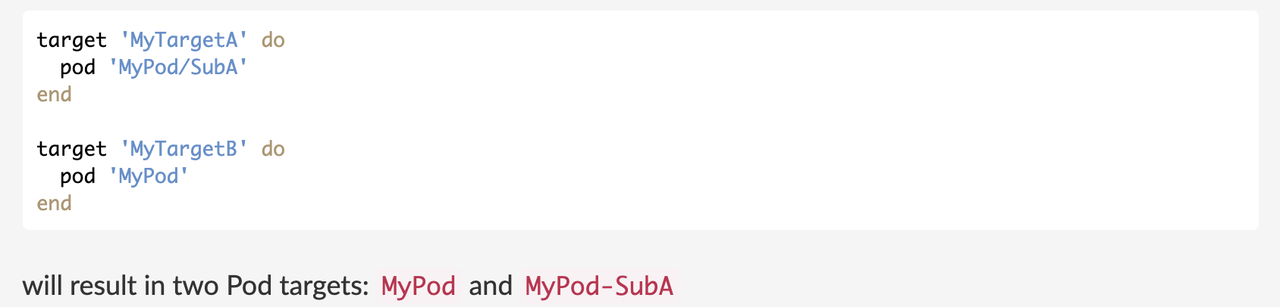
pod
项目工程的依赖源。
1 | # Version |
Podspec
podspec是一个pod的规范描述格式。
使用pod spec create SPEC_NAME命令可以快速创建一个podspec文件。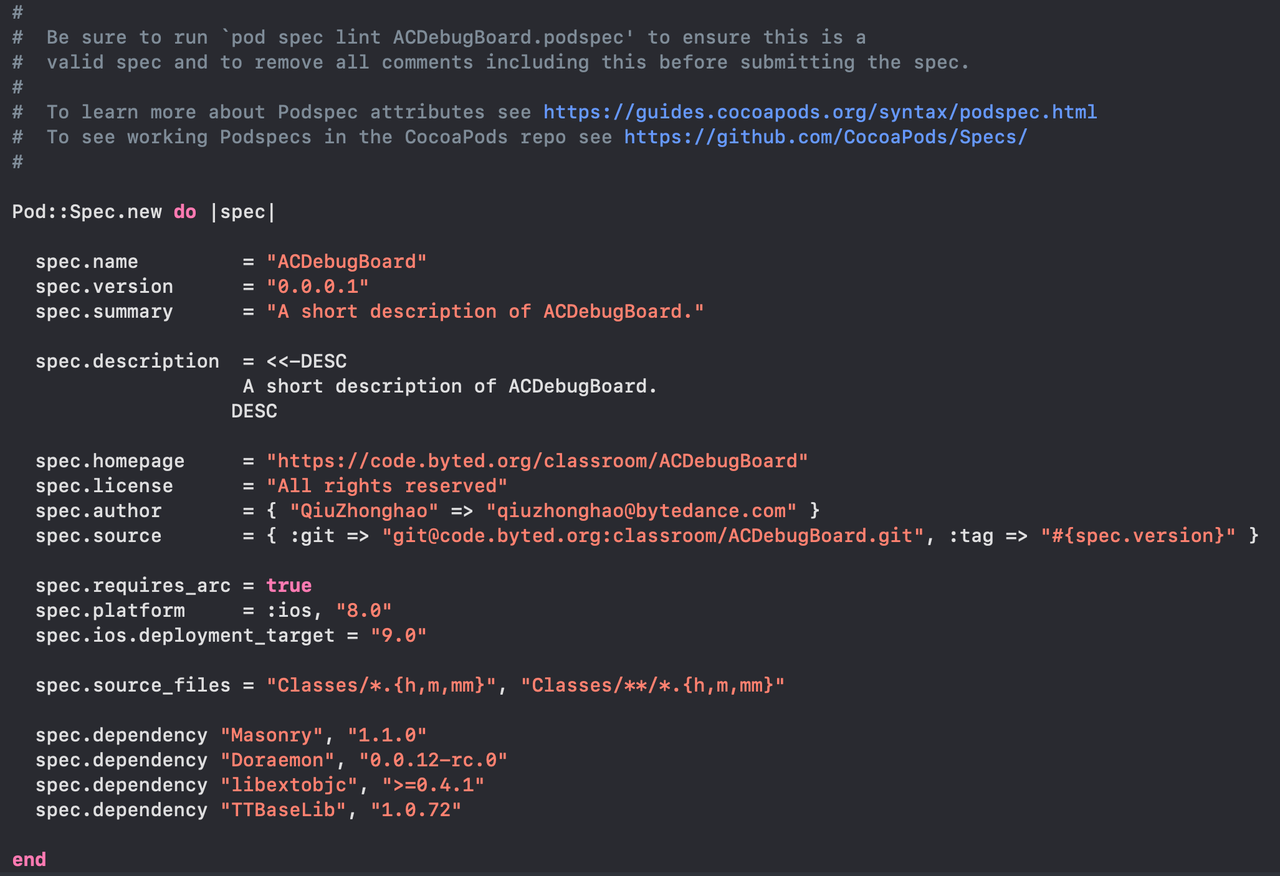
所有的spec参数列表在这里:https://guides.cocoapods.org/syntax/podspec.html#specification
- prepare_command
- 在pod下载之后要执行的脚本文件,该命令将在pod被清理和Pods.xcodeproj生成之前执行,可以用该命令下载、修改、删除任何文件;
1
2
3
4
5spec.prepare_command = 'ruby build_files.rb'
spec.prepare_command = <<-CMD
sed -i 's/MyNameSpacedHeader/Header/g' ./**/*.h
sed -i 's/MyNameOtherSpacedHeader/OtherHeader/g' ./**/*.h
CMD
- 在pod下载之后要执行的脚本文件,该命令将在pod被清理和Pods.xcodeproj生成之前执行,可以用该命令下载、修改、删除任何文件;
- deprecated
- spec.deprecated = true
- 标记该pod是非被废弃;
- compiler_flags
- spec.compiler_flags = ‘-DOS_OBJECT_USE_OBJC=0’, ‘-Wno-format’
- 传递给编译器的一个标记列表;
- pod_target_xcconfig
- spec.pod_target_xcconfig = { ‘OTHER_LDFLAGS’ => ‘-lObjC’ }
- 修改Pod.xcodeproj的xcconfig文件标志;
- user_target_xcconfig
- spec.user_target_xcconfig = { ‘MY_SUBSPEC’ => ‘YES’ }
- 修改目标工程的xcconfig文件标志,不建议使用,因为Pods.xcodeproj不应该影响目标工程文件;
- source_files
- spec.source_files = ‘Classes/*/.{h,m}’
- Pod的源文件;
- preserve_paths
- spec.preserve_path = ‘IMPORTANT.txt’
- pod下载后需要保留的文件路径,默认情况下,cocoapods会删除与文件模式不匹配的文件;
- resource_bundles
- s.resource_bundles = {‘ClassroomEVResource’ => [‘ClassroomEV/Resources/*’]}
- 指定pod的资源列表,podspec支持resource和resource_bundles两个不同的关键字来指定资源文件,但是cocoapods强烈推荐使用resource_bundles进行资源文件的指定,因为通过使用resource_bundles可以避免项目工程中不同pod的资源文件同名冲突。
Podfile.lock
在进行一次pod install或者pod update后,cocoapods会将安装的版本信息写入到podfile.lock文件中,因为Podfile中可能不会显示的指定pod的版本,cocoapods使用podfile.lock进行详细的版本控制。
可以使用pod outdated命令显示当前Podfile.lock版本落后的pod。
Manifest.lock
manifest.lock是podfile.lock文件的副本,一般工程不对Pods进行版本管理,而对podfile.lock进行版本管理,为了判断Pods下的pod与podfile.lock中的pod版本是否一致,否则会在编译时提示报错。
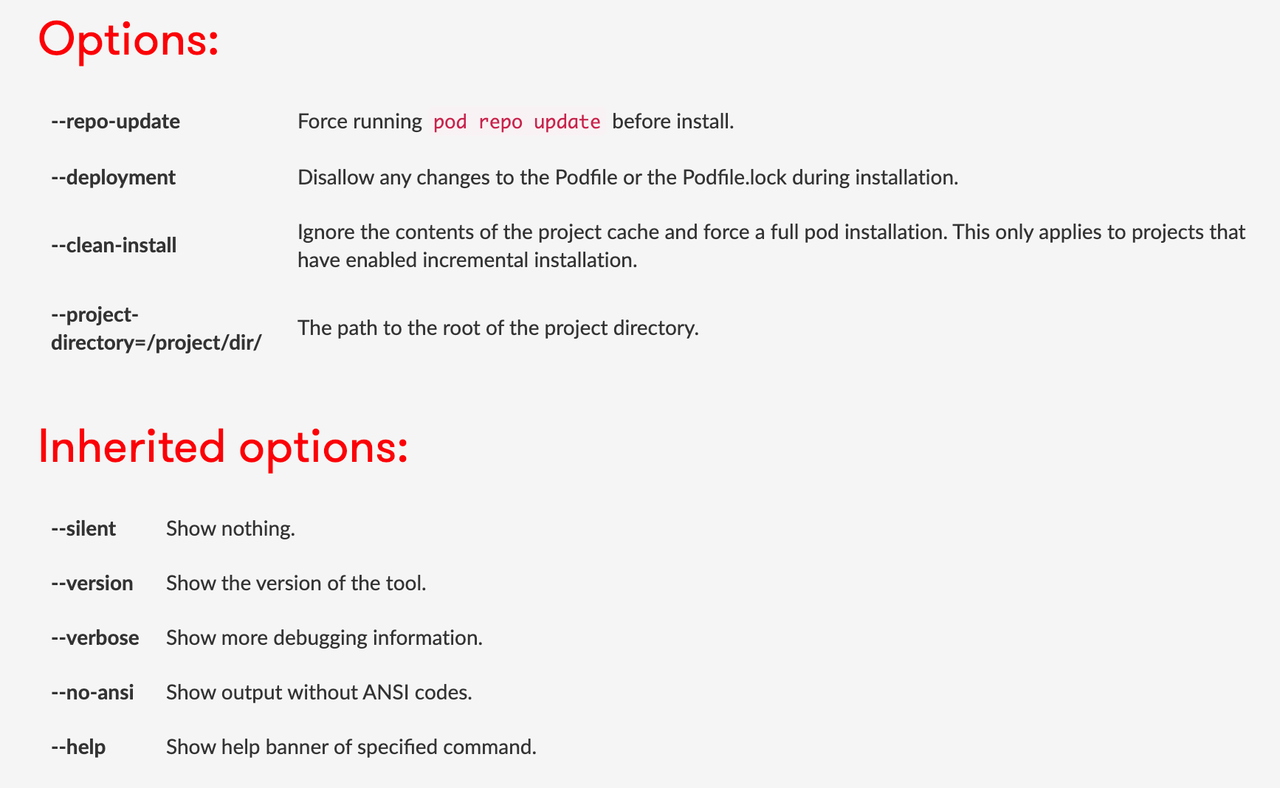
pod install vs. pod update
pod install
在每次执行pod install命令时,会将下载并安装的pod版本写入到Podfile.lock文件中;
而在执行pod install命令时,仅会对那些未在Podfile.lock中指定版本的pod进行操作;
- 对于未在Podfile.lock中指定版本的pod,将会搜索Podfile文件中描述的相对应版本
依赖解析算法Molinillo
pod update
- 执行pod update命令时,将不会考虑podfile.lock文件中指定的pod版本,寻找一个符合Podfile中规定的最新版本进行下载安装。
项目中应该采取怎样的依赖控制方法?
- 将Gemfile和Gemfile.lock纳入版本管理(必要);
- 是否需要将Podfile.lock纳入版本管理?
- 纳入的影响:
- 每次需要进行pod install,不能方便的更改pod版本,每次提交时有限制;
- 拉取代码冲突;
- 不纳入的影响:
- podfile中需要严格指定每个pod的版本,不然会出现pod版本冲突;
- 拉取代码后,不能显式的提醒需要进行pod install,可能有潜在的隐患;